Quick Start
This page gets a crowd moving in five steps, in Blueprint. Each step also has a C++
example tucked in a collapsible below it - expand it if you're scripting in C++, otherwise
ignore it. The only object you ever talk to is the crowd actor
(ACrowdToolkitActor): spawn agents on it, order them, and
read back their transforms to render them.
TIP
Every step is shown as Blueprint nodes. The ▸ C++ drop-down under each one holds the equivalent code - collapsed by default.
1. Get the crowd actor
You don't have to place anything in the level. The first time you ask for the crowd, the subsystem adopts a crowd actor already in the level, or spawns a default one if there is none. Grab it from anywhere with a single node.

// The world comes from the calling object, so this works anywhere.
ACrowdToolkitActor* Crowd = UCrowdToolkitLibrary::GetCrowd(this);
TIP
Place a configured BP_Crowd (or a plain Crowd Toolkit Actor) in your level if you want to
tune agent radius, speed, formation, pathfinding, walls, etc. in the details panel - GetCrowd
will adopt it. Keep one crowd actor per level.
2. Spawn agents
Agents live at world positions. The simplest start is a grid.
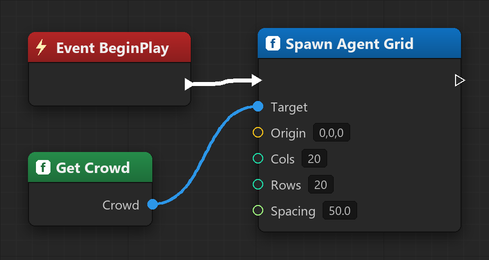
// A 20 x 20 block, 50 units apart, starting at Origin.
Crowd->SpawnAgentGrid(Origin, /*Cols*/ 20, /*Rows*/ 20, /*Spacing*/ 50.0f);

// ...or one at a time. Position.Z is the agent's initial tracked height.
Crowd->SpawnAgent(FVector(0, 0, 0));
Each agent gets an index (its slot in the crowd's arrays). The query and order nodes work in indices - that's all you need here. (For tracking a specific unit over time, see Indices & Stable IDs.)
3. Select agents
To order a group you need their indices. The query nodes return them in one pass. The classic RTS one is marquee select straight from a screen rectangle:
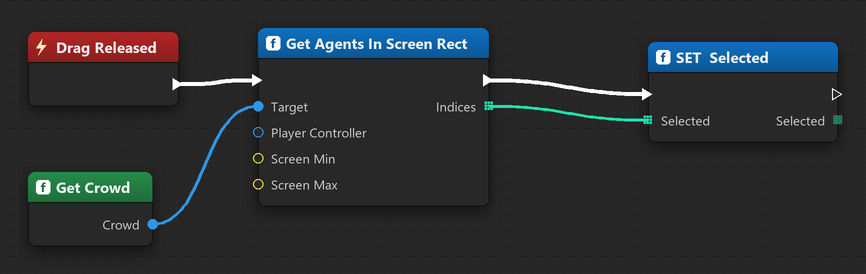
// Everything inside the on-screen drag rectangle (RTS marquee select).
TArray<int32> Picked = Crowd->GetAgentsInScreenRect(PlayerController, ScreenMin, ScreenMax);
Other ways to select: GetAgentsInRadius(Center, Radius) and GetAgentsInRect(Box2D) - same
idea, both return indices.
4. Order them to move
Hand the selected indices and a destination to Set Agents Target. They arrange themselves into a formation centred on the point and share one path there.
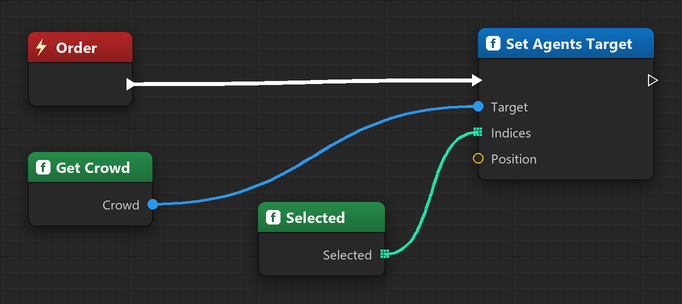
Crowd->SetAgentsTarget(Picked, ClickedWorldLocation);That's the whole movement loop - one call moves any number of units as a group. For a single
unit, Set Agent Target (Index, Position) is a convenience wrapper.
5. Render the agents
The crowd is simulation only - it stores positions, not meshes. Every frame, read the agents' transforms and push them into an Instanced Static Mesh.
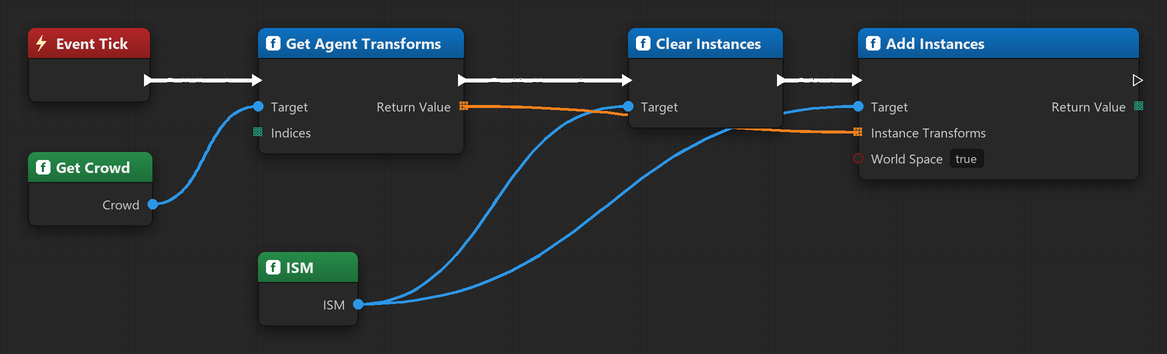
// On Tick, in your renderer actor:
TArray<FTransform> Transforms = Crowd->GetAgentTransforms({}); // {} = all agents
ISM->ClearInstances();
ISM->AddInstances(Transforms, /*bReturnIndices*/ false, /*bWorldSpace*/ true);
See Rendering Agents for the production pattern (updating instances in place instead of clearing each frame) and how facing / ground alignment is baked into the transforms.
The whole loop
Get Crowd ──► Spawn Agents ──► (on drag-select) GetAgentsInScreenRect
                                        │
                                        ▼
                              (on right-click) SetAgentsTarget
                                        │
              (every Tick) GetAgentTransforms ──► render instances
From here:
- Rendering Agents - the render loop in detail
- Wall Generation - block movement with walls / the nav mesh
- Navigation - flow field vs Spatial A*
- Crowd Actor reference - every property and function